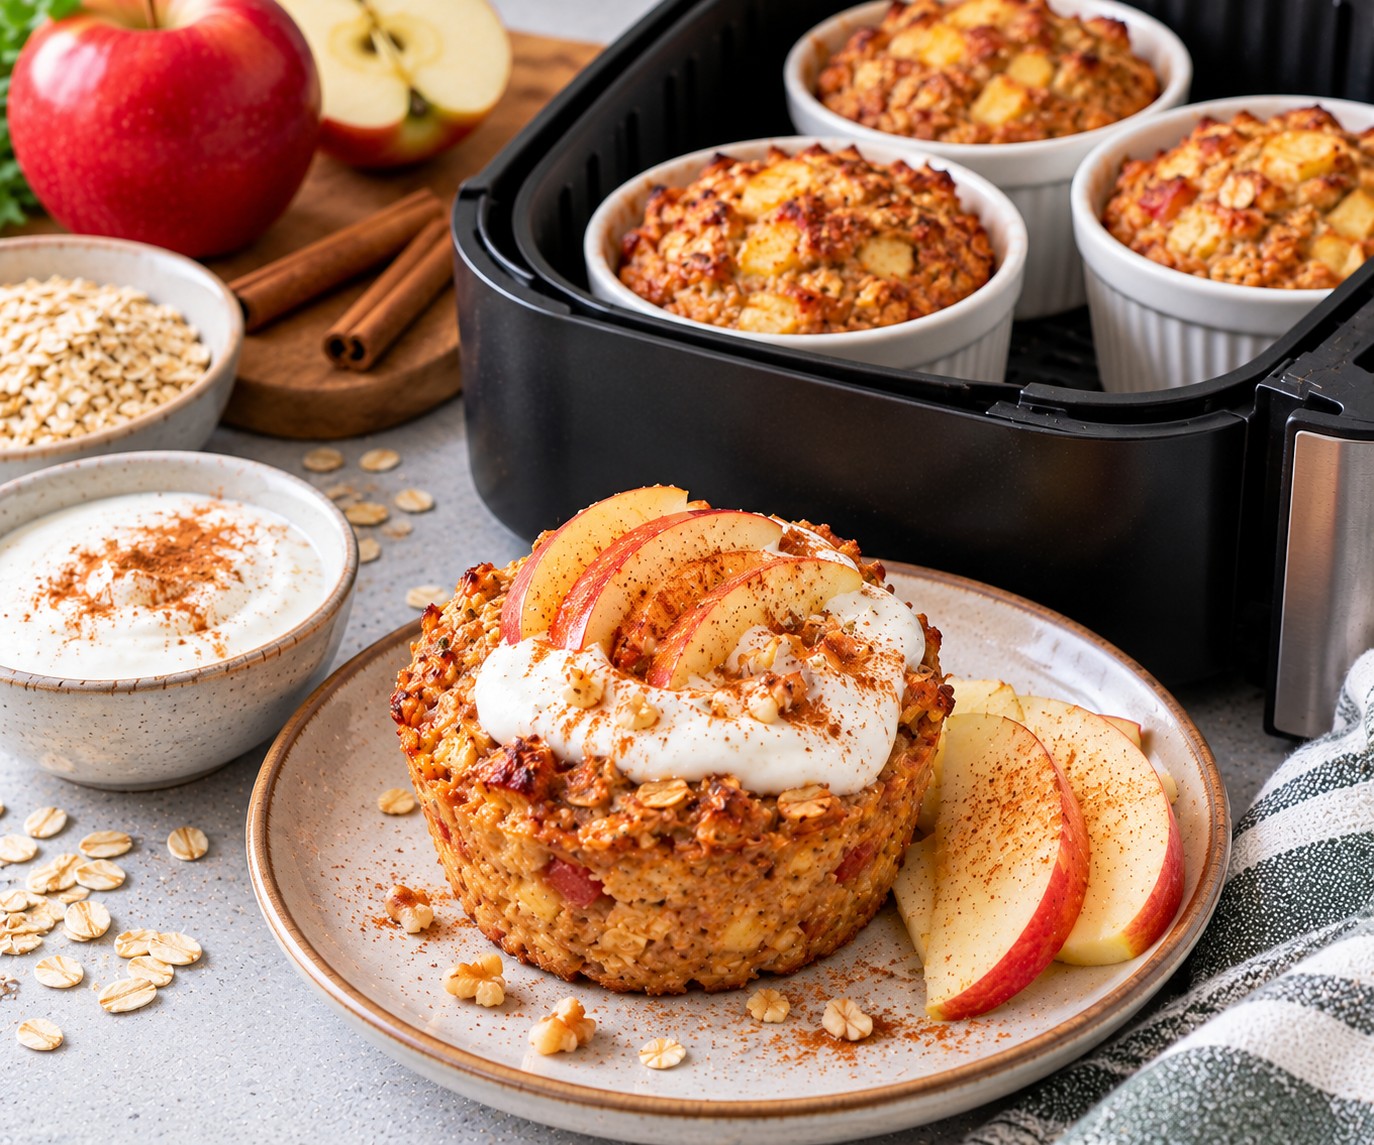
Air Fryer Apple & Cinnamon Baked Oat Cups

Four golden apple and cinnamon baked oat cups with Greek yoghurt beside an air fryer

These air fryer baked oats combine sweet apple, warming cinnamon and everyday porridge oats in soft, golden breakfast cups. They are easy to prepare, naturally sweetened with fruit and ideal when you want a homemade breakfast without spending much time in the kitchen.

Made with oats, eggs, milk and yoghurt, these individual baked oat cups can be served warm with a spoonful of Greek yoghurt and extra apple. They are also convenient for preparing breakfast ahead of a busy morning.

Recipe Details

  • Servings: 4
  • Makes: 4 baked oat cups
  • Preparation time: 10 minutes
  • Cooking time: 15–20 minutes
  • Total time: Approximately 30 minutes
  • Cooking method: Air fryer
  • Difficulty: Easy

Ingredients

For the baked oat cups

  • 120g porridge oats
  • 2 medium eggs
  • 120ml semi-skimmed milk
  • 100g fat-free natural Greek yoghurt
  • 1 medium apple, approximately 150g, grated
  • 1 tsp ground cinnamon
  • 1 tsp vanilla extract
  • 1 tsp baking powder
  • 1 tbsp maple syrup or honey, optional
  • A small pinch of salt
  • A little oil spray, for greasing

To serve

  • 100g fat-free natural Greek yoghurt
  • ½ apple, thinly sliced
  • A light dusting of ground cinnamon

How to Make Air Fryer Baked Oats

1. Prepare the air fryer and ramekins

Preheat the air fryer to 160°C, if required by your model.

Lightly grease four small, air-fryer-safe ramekins, approximately 150–180ml capacity each.

Check that the ramekins fit comfortably in the basket, leaving room for air to circulate. Cook in batches if necessary.

2. Prepare the apple

Wash the apple and grate it using the coarse side of a box grater.

There is no need to peel it unless preferred. Keeping the skin adds colour and texture.

3. Mix the wet ingredients

In a large bowl, whisk together the eggs, milk, Greek yoghurt, vanilla extract and maple syrup or honey, if using.

Stir in the grated apple until evenly combined.

4. Add the dry ingredients

Add the porridge oats, cinnamon, baking powder and a small pinch of salt.

Mix until combined, then leave the mixture to stand for 3–5 minutes so the oats can absorb some of the liquid.

5. Fill the ramekins

Divide the mixture evenly between the prepared ramekins.

Leave a little space at the top because the baked oats will rise slightly as they cook.

6. Air fry until golden

Place the ramekins carefully inside the air fryer basket.

Cook at 160°C for approximately 15–20 minutes, until the tops are lightly golden and the centres are set.

Insert a skewer into the centre of one cup. It should come out without wet batter. If necessary, continue cooking for another 2–3 minutes, checking regularly.

Cooking times vary depending on the size of the ramekins and the air fryer model.

7. Rest and serve

Leave the baked oat cups to stand for 3–5 minutes before serving, as the ramekins will be very hot.

Top each cup with a spoonful of Greek yoghurt, a few slices of fresh apple and a light dusting of cinnamon.

Tips for the Best Air Fryer Baked Oats

Use ordinary porridge oats. They soften nicely while retaining a little texture.

Grate the apple finely enough to distribute it evenly. This helps keep the cups moist.

Avoid overfilling the ramekins. The mixture rises slightly during cooking.

Check the centres before serving. The tops may brown before the middle has fully set.

Cook at a moderate temperature. A lower air fryer temperature helps prevent the tops from becoming too dark.

Add the yoghurt after baking. This keeps the topping cool and creamy.

Easy Budget-Friendly Variations

Apple and Raisin Baked Oats

Add 1 tablespoon of raisins to the mixture for extra sweetness.

Pear and Cinnamon Oat Cups

Replace the grated apple with a ripe grated pear.

Banana Baked Oats

Use half a mashed banana instead of the optional maple syrup or honey.

Berry Baked Oat Cups

Add a small handful of fresh or frozen berries. If using frozen berries, the cups may need a little longer to cook.

Nutty Apple Oat Cups

Sprinkle a small amount of chopped walnuts over the mixture before baking. Check for nut allergies before serving.

Can You Make Baked Oat Cups Ahead?

Yes. These individual cups are useful for preparing breakfast in advance.

Bake them, allow them to cool promptly and refrigerate in an airtight container. Keep the fresh apple and yoghurt toppings separate until serving.

How to Store and Reheat

Store the cooled baked oat cups in an airtight container in the fridge at 5°C or below for up to 2 days.

Reheat in the air fryer at 150°C for approximately 3–5 minutes, or until piping hot throughout. Reheat only once.

You can also enjoy them cold if they have been stored correctly.

The baked cups can be frozen without the toppings. Wrap them individually, freeze in a suitable container and defrost thoroughly in the fridge before reheating.

Add fresh yoghurt and apple just before serving.

Frequently Asked Questions

Can I make baked oats in the air fryer?

Yes. Small, air-fryer-safe ramekins work well for individual portions. Use a moderate temperature and check that the centres are fully set.

Do I need to blend the oats?

No. This recipe uses whole porridge oats for a slightly textured finish. If you prefer a smoother, cake-like consistency, blend the oats before mixing.

Can I make these baked oat cups without added sugar?

Yes. The grated apple adds natural sweetness, so the maple syrup or honey is optional.

Can I use plant-based milk?

Yes. An unsweetened plant-based milk can replace semi-skimmed milk, although the flavour and nutritional content may differ.

Can I use frozen berries instead of apple?

Yes. Add a small amount of frozen berries to the mixture and allow extra cooking time if needed.

Why are my baked oats wet in the middle?

They may need a little longer to cook, particularly if the ramekins are deep or the fruit releases extra moisture. Check the centre with a skewer before serving.

More Easy Breakfast and Air Fryer Recipes

For another simple homemade meal, try our Air Fryer Cottage Cheese Pizza Flatbreads.

You can also explore our Healthy High-Protein & Fibre-Rich Recipes collection for more everyday breakfast, lunch and dinner inspiration.

A Warm and Comforting Breakfast

These air fryer apple and cinnamon baked oat cups are an easy way to turn simple ingredients into a cosy homemade breakfast. Prepare a batch ahead of time and serve with Greek yoghurt and fresh fruit whenever you need a convenient morning meal.

Allergen note: Contains eggs and milk. Check the labels of your oats, yoghurt and other packaged ingredients. Use certified gluten-free oats if preparing the recipe for someone who needs to avoid gluten.

Baked Egg Custard with Orange and Berries

Baked Egg Custard with Orange and Berries

This baked egg custard is a comforting, gently spiced dessert with a smooth, creamy texture and a delicate hint of orange. Made with eggs, skimmed milk, vanilla and cinnamon, it is baked slowly in a water bath, then chilled and served with fresh mixed berries.

It is an easy make-ahead dessert for family meals, weekend lunches or whenever you fancy something simple and homemade.

Recipe Details

  • Servings: 4
  • Preparation time: 15 minutes
  • Cooking time: 40–50 minutes
  • Chilling time: At least 3 hours
  • Total time: Approximately 4½ hours, including cooling and chilling

Ingredients

For the custard

  • 4 large eggs
  • 600ml skimmed milk
  • 1 tsp vanilla extract
  • 3 tbsp granulated sweetener suitable for baking, or to taste
  • ½ tsp ground cinnamon, divided
  • Finely grated zest of 1 orange
  • A small pinch of ground nutmeg

To serve

  • 200g mixed berries, such as raspberries, blueberries and strawberries
  • 1–2 tbsp freshly squeezed orange juice, optional
  • A little extra orange zest, optional

How to Make Baked Egg Custard

1. Prepare the oven and ramekins

Preheat the oven to 180°C/160°C fan/Gas 4.

Place four ovenproof ramekins, each with a capacity of approximately 200ml, in a deep roasting tin. Put the kettle on to boil.

2. Whisk the eggs

Crack the eggs into a large mixing bowl and whisk gently until combined. Avoid beating too much air into the mixture, as this can create bubbles on the surface of the custard.

3. Warm the milk

Pour the skimmed milk into a saucepan. Add the vanilla extract, granulated sweetener, half the cinnamon and most of the orange zest.

Warm over a low heat, stirring occasionally, until steaming but not boiling. Remove from the heat.

4. Combine the custard

Gradually pour the warm milk into the eggs, whisking continuously. Adding it slowly helps prevent the eggs from cooking too quickly.

Strain the mixture through a fine sieve into a pouring jug to remove any small lumps and create a smoother texture.

5. Fill the ramekins

Divide the custard mixture evenly between the four ramekins. Sprinkle each with a little nutmeg.

Carefully pour hot water into the roasting tin until it reaches approximately halfway up the sides of the ramekins. Take care not to splash water into the custard.

6. Bake gently

Transfer the roasting tin to the oven and bake for 40–50 minutes, checking from 35 minutes onwards. The custards are ready when the edges are set but the centres still have a gentle wobble.

The exact cooking time will depend on the size and depth of your ramekins. Avoid baking until completely firm, as the custard will continue to set as it cools.

7. Cool and chill

Carefully lift the ramekins out of the water bath and leave to cool. Once no longer warm, cover and refrigerate for at least 3 hours.

8. Serve with berries

If using the orange juice, gently toss it with the mixed berries just before serving.

Top each chilled custard with berries, the remaining cinnamon and a little reserved orange zest.

Tips for a Smooth Baked Egg Custard

  • Use gentle heat. Warm the milk without boiling it, and add it gradually to the eggs.
  • Strain the mixture. This removes any small pieces of cooked egg and gives the custard a finer texture.
  • Do not skip the water bath. It provides gentler, more even heat and reduces the risk of a grainy texture.
  • Look for a slight wobble. The centre should move gently when the ramekin is nudged, rather than appearing liquid.
  • Allow enough chilling time. The custards become firmer as they cool.

Easy Flavour Variations

Vanilla and nutmeg: Leave out the orange zest and cinnamon for a more traditional baked egg custard.

Cardamom and orange: Replace the cinnamon with a small pinch of ground cardamom.

Summer berries: Serve with raspberries, strawberries or blueberries, depending on what is in season.

A little crunch: Sprinkle chopped toasted almonds over the custard just before serving, if preferred.

Can You Make Baked Egg Custard Ahead?

Yes. Prepare the custards the day before, allow them to cool and store them covered in the fridge. Keep the berries separate until serving so they stay fresh.

How to Store Baked Egg Custard

Cover the cooled custards and refrigerate promptly. Store at 5°C or below and enjoy within 2–3 days.

Keep any prepared fruit separately and add it just before serving. Freezing is not recommended, as thawing can spoil the smooth texture.

Frequently Asked Questions

Why has my baked egg custard turned watery?

Custard can become watery or grainy if it is cooked at too high a temperature or left in the oven for too long. A water bath and gentle baking help prevent this.

Can I use semi-skimmed milk?

Yes. Semi-skimmed milk can be used instead of skimmed milk and will produce a slightly richer custard.

Can I serve baked egg custard warm?

Yes. Although this orange and berry version is lovely chilled, you can also enjoy it slightly warm once the custard has set.

How do I know when the custard is cooked?

The edges should be set and the centre should wobble gently. It should not look runny when the ramekin is moved.

More Homemade Desserts to Try

If you enjoy homemade desserts, you might also like our Apple Betty for a comforting fruit pudding, or our Mini Egg Cheesecake for a more indulgent treat.

A Simple Make-Ahead Dessert

With its delicate orange flavour, warming spices and fresh berry topping, this baked egg custard is a lovely way to finish a family meal. Prepare it in advance and keep it chilled until you are ready to serve.

Explore More Recipes on MyNRecipes

For more affordable  family meals and everyday cooking inspiration, explore our Budget Family Meals UK guide and Healthy High-Protein & Fibre-Rich Recipes collection.

Allergen note: Contains eggs and milk. Check the labels of your chosen sweetener and any additional toppings for other allergens.

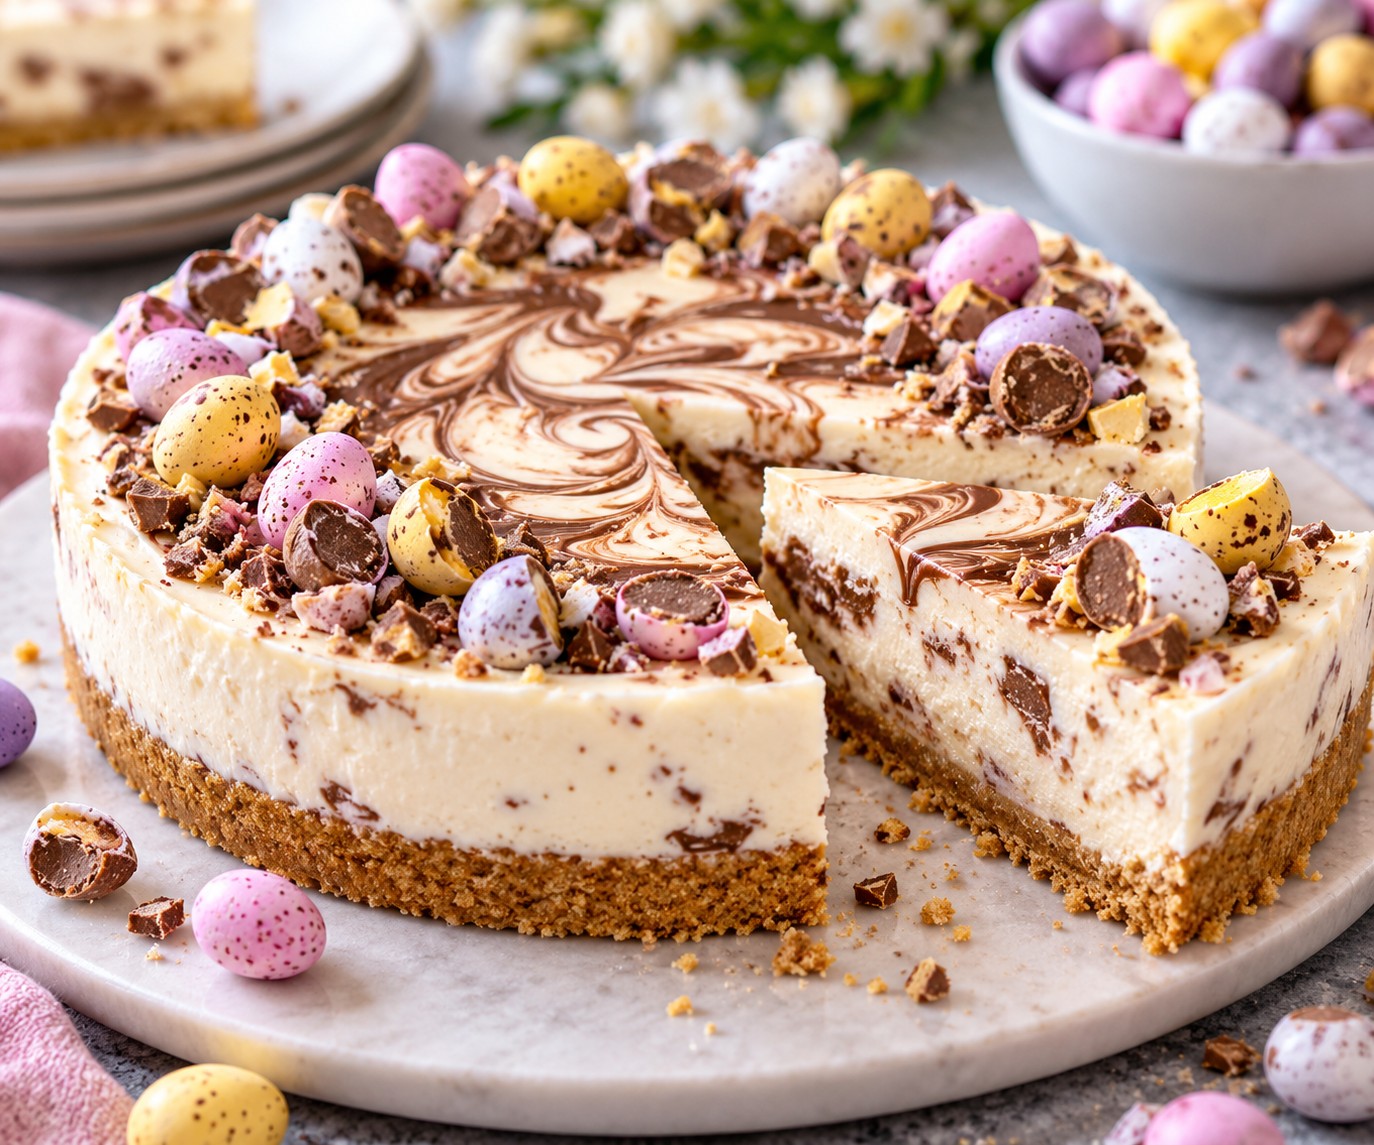
Mini Egg Swirled Cheesecake (No Bake)

Mini Egg Cheesecake, No-Bake Cheesecake, Easter Desserts, Make-Ahead Desserts

This Mini Egg cheesecake is a creamy, no-bake dessert with a crunchy digestive biscuit base, delicate chocolate swirls and a colourful Mini Egg topping. Made with Greek yoghurt and soft cheese, it is a lovely make-ahead treat for Easter gatherings, family celebrations or a weekend dessert.

The filling takes just a little time to prepare, then the fridge does the rest. For the neatest slices, make the cheesecake the day before you plan to serve it.

Recipe Details

  • Servings: 10 slices
  • Preparation time: 20 minutes
  • Chilling time: At least 4–6 hours, preferably overnight
  • Cooking time: Approximately 5 minutes to melt and warm the ingredients
  • Equipment: 20cm springform cake tin

Ingredients

Biscuit base

  • 10 wholemeal digestive biscuits (approximately 140–150g)
  • 50g low-fat baking spread, melted

For the cheesecake filling

  • 4 gelatine leaves, or the quantity recommended on the packet for setting approximately 750g of dairy filling
  • 600g fat-free natural Greek yoghurt, divided
  • 150g extra-light plain soft cheese
  • 1 tsp vanilla extract
  • 2 tbsp granulated sweetener suitable for cold desserts, or to taste
  • 30g milk chocolate, melted and cooled slightly

For the topping

  • 10 Cadbury Mini Eggs, roughly chopped

How to Make Mini Egg Cheesecake

1. Prepare the biscuit base

Line the base of a 20cm springform cake tin with baking parchment.

Crush the digestive biscuits into fine crumbs using a food processor or a rolling pin. Mix with the melted spread until evenly coated.

Press the mixture firmly into the base of the tin using the back of a spoon. Refrigerate for at least 30 minutes while you prepare the filling.

2. Soften the gelatine

Place the gelatine leaves in a bowl of cold water and leave to soak for approximately 5 minutes, or according to the packet instructions.

Once softened, lift them out and gently squeeze away the excess water.

3. Prepare the cheesecake filling

Place 400g of the Greek yoghurt in a large mixing bowl. Add the soft cheese, vanilla extract and sweetener, then whisk until smooth and creamy.

Put the remaining 200g of yoghurt in a small saucepan and warm gently over a low heat. Do not allow it to boil.

Remove the saucepan from the heat. Add the softened gelatine and stir until completely dissolved. Allow the mixture to cool slightly, but do not leave it long enough to begin setting.

4. Combine the filling

Gradually whisk the warm gelatine mixture into the bowl of cheesecake filling until thoroughly combined.

Make sure the gelatine is evenly distributed, as this will help the cheesecake set consistently.

5. Create the chocolate swirls

Spoon a little of the cheesecake filling into a separate bowl and gradually stir it into the melted, slightly cooled chocolate until smooth.

Pour the plain filling over the chilled biscuit base. Add small spoonfuls of the chocolate mixture across the surface.

Use a skewer or the tip of a knife to gently swirl the chocolate through the filling. Avoid overmixing so the pattern remains visible.

6. Chill until set

Smooth the surface if needed, then cover the tin and refrigerate for at least 4–6 hours, preferably overnight.

The cheesecake should feel firm and hold its shape before you remove it from the tin.

7. Decorate and serve

Carefully release the springform tin and transfer the cheesecake to a serving plate.

Scatter the roughly chopped Mini Eggs over the top just before serving. Slice into 10 portions using a sharp knife, wiping the blade between cuts for a neat finish.

Tips for the Best No-Bake Cheesecake

  • Check your gelatine packet. Leaf size and setting strength vary between brands, so follow the manufacturer’s guidance for the amount of filling.
  • Do not boil the yoghurt. Gentle heat is enough to dissolve the softened gelatine.
  • Avoid adding very hot chocolate directly to cold yoghurt. Mixing it with a little filling first helps create smoother swirls.
  • Chill overnight if possible. This makes the cheesecake easier to remove from the tin and slice.
  • Add Mini Eggs just before serving. This keeps their colourful shells looking fresh and prevents them from softening in the fridge.

Easy Variations

Extra chocolate: Add a little grated milk chocolate over the top alongside the Mini Eggs.

Vanilla cheesecake: Leave out the melted chocolate for a simple vanilla filling with a Mini Egg topping.

Different biscuit base: Replace the wholemeal digestives with regular digestive biscuits, using approximately the same weight.

Seasonal topping: Outside Easter, replace the Mini Eggs with fresh berries or a little chopped chocolate.

Can You Make Mini Egg Cheesecake Ahead?

Yes. This cheesecake is ideal for preparing the day before serving. Leave it covered in the fridge overnight and add the Mini Egg topping shortly before bringing it to the table.

How to Store Mini Egg Cheesecake

Store the cheesecake covered in the fridge at 5°C or below and enjoy within 3 days. Keep any leftover slices refrigerated rather than leaving them at room temperature.

Freezing is not recommended, as the yoghurt-based filling may become watery or grainy when thawed.

Frequently Asked Questions

Does Mini Egg cheesecake need baking?

No. This is a no-bake cheesecake. The gelatine helps the yoghurt and soft cheese filling set in the fridge.

Why has my cheesecake not set?

The gelatine may not have dissolved fully, or the quantity may not have been sufficient for the particular brand used. Check the packet instructions and allow the cheesecake enough time to chill.

Can I use regular Greek yoghurt?

Yes. Full-fat Greek yoghurt can be used for a richer filling, although the finished texture may differ slightly.

When should I add the Mini Eggs?

Add them just before serving for the best appearance and crunch.

More Homemade Desserts to Try

If you enjoy easy homemade desserts, try our Baked Egg Custard with Orange and Berries for a gently spiced make-ahead pudding, or our Apple Betty for a comforting fruit dessert.

A Lovely Easter Dessert to Share

With its creamy vanilla filling, chocolate swirls and colourful topping, this Mini Egg cheesecake makes an inviting centrepiece for an Easter table. Prepare it ahead of time, then decorate and slice when you are ready to serve.