Crispy Chicken Nuggets with a Wholesome Twist

Crispy Chicken Nuggets with a Wholesome Twist Indulge in a guilt-free treat with these baked chicken nuggets, crafted with wholesome wholemeal bread crumbs and a touch of mustard powder and dried mixed herbs. They're perfect for satisfying cravings without compromising on flavor or nutrition. About Time: Prep Time: 15 mins Cook Time: 40 mins Total Time: 55 mins Yield: Serves 4 Slimming World: 1½ Syns per serving Ingredients: Low-calorie cooking spray 60g wholemeal bread roll, torn into pieces 1 tsp mustard powder 2 tsp dried mixed herbs 2 large eggs 4 skinless, boneless chicken breasts, thinly sliced Instructions: Preheat your oven to 200°C (fan 180°C/gas 6). Line a baking sheet with non-stick baking parchment and spray with low-calorie cooking spray. In a food processor, blend the torn bread roll into fine crumbs. Transfer the crumbs to a shallow bowl and stir in the mustard powder and dried mixed herbs. In a separate shallow bowl, lightly beat the eggs. Dip each chicken slice into the beaten egg, then thoroughly coat in the breadcrumb mixture. Arrange the coated nuggets on the prepared baking sheet. Bake for 20-25 minutes, or until the chicken is cooked through and the breadcrumbs are golden brown and crispy. Serve the hot chicken nuggets with Slimming World chips, baked beans, and a crisp salad for a complete and satisfying meal. Tips: For extra flavor, add a pinch of grated Parmesan cheese to the breadcrumb mixture. To ensure even cooking, arrange the chicken nuggets in a single layer on the baking sheet. If you don't have a food processor, you can simply chop the bread roll into fine crumbs using a knife. Enjoy these delicious and nutritious chicken nuggets whenever the craving strikes! Elevate your culinary experience by transforming this oven-baked chicken nugget recipe into an air fryer-powered masterpiece. Indulge in the crisp, golden goodness of homemade nuggets without the hassle or mess of deep frying. Here's how to adapt the recipe for the air fryer: Ingredients: Low-calorie cooking spray 60g wholemeal roll, torn into pieces 1 tsp mustard powder 2 tsp dried mixed herbs 2 eggs 4 skinless and boneless chicken breasts, thinly sliced Instructions: Preheat your air fryer to 400°F (200°C). Follow steps 2 and 3 of the oven-baked recipe to create the breadcrumb mixture. Spray the air fryer basket with low-calorie cooking spray. Dip the thinly sliced chicken breasts in the beaten eggs, ensuring they are fully coated. Generously coat the coated chicken pieces in the breadcrumb mixture until evenly coated. Arrange the breaded chicken nuggets in a single layer in the air fryer basket, ensuring they do not touch. Air fry for 10-12 minutes, or until the chicken is cooked through and the breadcrumbs are golden brown. Serve hot with your favorite dipping sauces. Enjoy the healthier, air-fried version of this classic comfort food while maintaining the irresistible taste and texture

Crispy Chicken Nuggets with a Wholesome Twist

Indulge in a guilt-free treat with these baked chicken nuggets, crafted with wholesome wholemeal bread crumbs and a touch of mustard powder and dried mixed herbs. They’re perfect for satisfying cravings without compromising on flavor or nutrition.

About Time:

  • Prep Time: 15 mins
  • Cook Time: 40 mins
  • Total Time: 55 mins
  • Yield: Serves 4

Ingredients:

  • Low-calorie cooking spray
  • 60g wholemeal bread roll, torn into pieces
  • 1 tsp mustard powder
  • 2 tsp dried mixed herbs
  • 2 large eggs
  • 4 skinless, boneless chicken breasts, thinly sliced

Instructions:

  1. Preheat your oven to 200°C (fan 180°C/gas 6). Line a baking sheet with non-stick baking parchment and spray with low-calorie cooking spray.
  2. In a food processor, blend the torn bread roll into fine crumbs. Transfer the crumbs to a shallow bowl and stir in the mustard powder and dried mixed herbs.
  3. In a separate shallow bowl, lightly beat the eggs.
  4. Dip each chicken slice into the beaten egg, then thoroughly coat in the breadcrumb mixture. Arrange the coated nuggets on the prepared baking sheet.
  5. Bake for 20-25 minutes, or until the chicken is cooked through and the breadcrumbs are golden brown and crispy.
  6. Serve the hot chicken nuggets with diet chips, baked beans, and a crisp salad for a complete and satisfying meal.

Tips:

  • For extra flavor, add a pinch of grated Parmesan cheese to the breadcrumb mixture.
  • To ensure even cooking, arrange the chicken nuggets in a single layer on the baking sheet.
  • If you don’t have a food processor, you can simply chop the bread roll into fine crumbs using a knife.
  • Enjoy these delicious and nutritious chicken nuggets whenever the craving strikes!

Elevate your culinary experience by transforming this oven-baked chicken nugget recipe into an air fryer-powered masterpiece. Indulge in the crisp, golden goodness of homemade nuggets without the hassle or mess of deep frying.

Here’s how to adapt the recipe for the air fryer:

Ingredients:

  • Low-calorie cooking spray
  • 60g wholemeal roll, torn into pieces
  • 1 tsp mustard powder
  • 2 tsp dried mixed herbs
  • 2 eggs
  • 4 skinless and boneless chicken breasts, thinly sliced

Instructions:

  1. Preheat your air fryer to 400°F (200°C).
  2. Follow steps 2 and 3 of the oven-baked recipe to create the breadcrumb mixture.
  3. Spray the air fryer basket with low-calorie cooking spray.
  4. Dip the thinly sliced chicken breasts in the beaten eggs, ensuring they are fully coated.
  5. Generously coat the coated chicken pieces in the breadcrumb mixture until evenly coated.
  6. Arrange the breaded chicken nuggets in a single layer in the air fryer basket, ensuring they do not touch.
  7. Air fry for 10-12 minutes, or until the chicken is cooked through and the breadcrumbs are golden brown.
  8. Serve hot with your favorite dipping sauces.
  9. Enjoy the healthier, air-fried version of this classic comfort food while maintaining the irresistible taste and texture

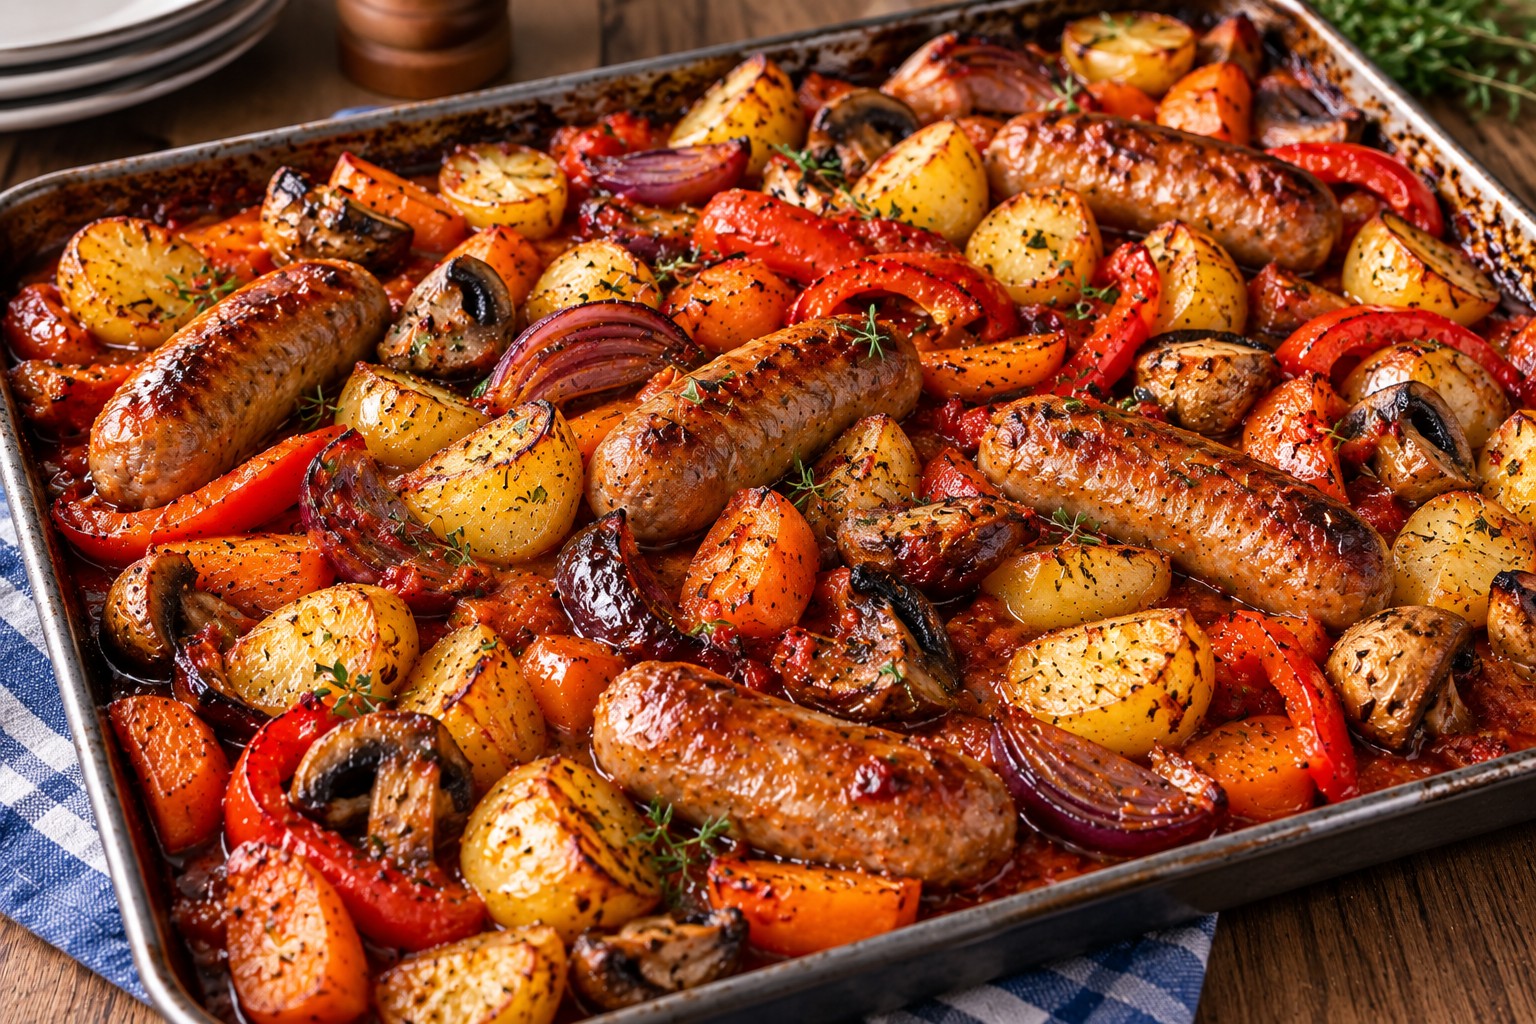
Easy Sausage and Vegetable Tray Bake with Tomato Sauce

Oven-baked pork sausages with golden baby potatoes, carrots, red peppers, onions and mushrooms in tomato sauce.

When you need a family dinner that doesn’t involve standing over the hob, this easy sausage and vegetable tray bake is a practical choice. Juicy pork sausages roast alongside baby potatoes, carrots, red onions, peppers and mushrooms, while a simple garlic and tomato sauce brings everything together.

The potatoes and carrots go into the oven first, giving them time to soften before the quicker-cooking vegetables are added. The result is a hearty, colourful oven dinner made with familiar UK supermarket ingredients and very little hands-on cooking.

Perfect for busy midweek evenings, this budget-friendly sausage tray bake is also easy to adapt to the vegetables you already have.

Why You’ll Love This Sausage Tray Bake

  • Minimal preparation: Chop the vegetables, arrange everything in a roasting tin and let the oven do most of the work.
  • Affordable ingredients: Uses everyday vegetables, sausages and a simple tomato-based sauce.
  • Easy to adapt: Swap vegetables according to the season or what needs using up.
  • Family-friendly: A complete, comforting dinner with potatoes, vegetables and sausages.
  • Less washing-up: Most of the cooking happens in one roasting tin.

Recipe at a Glance

Details Information
Servings Approximately 4
Preparation time 15 minutes
Cooking time 55–65 minutes
Total time Approximately 1 hour 10–20 minutes
Course Main meal
Cooking method Oven-baked

Ingredients

For the Sausage and Vegetables

  • 8 pork sausages
  • 500g baby potatoes, halved
  • 2 carrots, cut into small, even pieces
  • 2 red onions, cut into wedges
  • 1 red pepper, sliced
  • 250g mushrooms, quartered
  • 1 tbsp vegetable oil
  • 1 tsp dried thyme
  • Freshly ground black pepper

For the Tomato Sauce

  • 2 tbsp tomato purée
  • 2 garlic cloves, crushed
  • 250ml chicken stock

Ingredient Notes and Affordable Swaps

Sausages: Choose a variety your family enjoys. Supermarket own-brand sausages can help keep the overall cost down.

Baby potatoes: Halving them helps them roast evenly. If using larger potatoes, cut them into similar-sized pieces.

Carrots: Cut these into relatively small pieces because they need longer to soften than peppers or mushrooms.

Mushrooms: Quartering them helps prevent smaller pieces from shrinking too much in the oven.

Tomato purée: Creates a savoury tomato sauce without requiring a jar of ready-made cooking sauce.

Chicken stock: Use a stock cube dissolved in hot water if that is what you have available. Check the salt content before adding any extra seasoning.

How to Make Sausage and Vegetable Tray Bake

Step 1: Preheat the Oven

Preheat your oven to 200°C (180°C fan).

Choose a large roasting tin with enough space for the ingredients to sit in a reasonably even layer.

Step 2: Give the Root Vegetables a Head Start

Place the halved baby potatoes, chopped carrots and red onion wedges in the roasting tin.

Drizzle with the vegetable oil, sprinkle over the dried thyme and season with black pepper.

Toss everything together, then roast for 20 minutes.

Starting with these vegetables helps them become tender without overcooking the peppers and mushrooms later.

Step 3: Add the Sausages and Remaining Vegetables

Remove the roasting tin carefully from the oven.

Add the pork sausages, sliced red pepper and quartered mushrooms.

Turn the vegetables gently to distribute them around the sausages.

Step 4: Prepare the Tomato Sauce

In a jug, mix the tomato purée, crushed garlic and chicken stock until combined.

Pour the mixture around the sausages and vegetables rather than directly over every sausage. This allows the sausages to brown while the vegetables cook in the savoury sauce.

Step 5: Roast Until Golden and Cooked Through

Return the tin to the oven and roast for another 35–45 minutes.

Turn the sausages halfway through cooking to encourage even browning.

The dish is ready when the potatoes and carrots are tender, the sauce has reduced slightly and the sausages are thoroughly cooked in the centre.

If using a food thermometer, check that the pork sausages reach 75°C in the centre.

Allow the tray bake to stand briefly before serving.

Tips for the Best Sausage Tray Bake

Use a Large Enough Roasting Tin

Overcrowding can cause the vegetables to steam rather than roast. If necessary, divide the ingredients between two tins.

Cut Vegetables to Suit Their Cooking Times

Carrots and potatoes need more time than mushrooms and peppers. Smaller root vegetable pieces and staggered cooking help everything finish together.

Keep the Sauce Around the Ingredients

Pouring the tomato stock mixture around the sausages allows their upper surfaces to brown. If the sauce reduces too quickly, add a small splash of hot water.

Check the Sausages Before Serving

Cooking times vary depending on sausage thickness and your oven. Always check that they are cooked thoroughly rather than relying on colour alone.

Easy Ways to Make This Dinner More Budget-Friendly

This recipe is flexible enough to fit around your weekly supermarket shop.

Choose sausages that suit your budget and compare prices per kilogram. Use the vegetables you already have instead of buying every ingredient again.

Parsnips can replace some of the carrots, while courgettes can be added with the peppers and mushrooms. If mushrooms are expensive that week, use extra onion or another suitable vegetable.

Frozen sliced peppers are another practical option. Add them during the second roasting stage and allow time for excess moisture to evaporate.

What to Serve with Sausage and Vegetable Tray Bake

The potatoes and vegetables make this a substantial dinner on their own. If you would like an extra side, try steamed cabbage, green beans, broccoli or a slice of crusty bread to soak up the tomato sauce.

For younger family members, cut the cooked sausages into age-appropriate pieces before serving.

Make Ahead, Storage and Reheating

You can chop the potatoes, carrots and onions in advance and keep them refrigerated in suitable covered containers. Store prepared potatoes appropriately to prevent discolouration.

Allow cooked leftovers to cool promptly and refrigerate within two hours. Eat within 48 hours, and reheat only once until steaming hot throughout.

For the best texture, reheat the tray bake in an ovenproof dish rather than adding too much liquid.

Frequently Asked Questions

Can I use frozen peppers?

Yes. Add them with the sausages and mushrooms. Frozen peppers may release more moisture, so the sauce could need slightly longer to reduce.

Can I use different sausages?

Yes. Pork sausages work well, but you can use another suitable variety. Follow its cooking instructions and check that it is thoroughly cooked before serving.

Why do the potatoes go into the oven first?

Potatoes and carrots take longer to soften than peppers and mushrooms. Roasting them first helps prevent the softer vegetables from becoming overcooked.

Can I prepare this tray bake ahead of time?

You can prepare the vegetables and mix the sauce in advance, keeping everything appropriately chilled. Assemble and cook the dish when you are ready for dinner.

Can I make this recipe without mushrooms?

Absolutely. Replace them with extra peppers, courgette or another vegetable your family enjoys.

More Affordable Family Dinner Ideas

Looking for more easy meals that use familiar supermarket ingredients? Explore our Budget Family Meals UK guide for practical recipes and weekly dinner inspiration.

You can also organise your meals and shopping list with our Free UK Family Meal Planner.

Cream Horns Recipe

Cream Horns Recipe Slimming World Cream Horns, a delightful treat that won't derail your weight loss goals. These light and airy cones are crafted with fluffy quark, a creamy alternative to traditional pastry, and a touch of sweetness from white chocolate Options and granulated sweetener. Top with fresh strawberries or your favorite soft fruits for a burst of flavor . About Time: Prpe Time: 10 mins Cook Time: 10 mins Total Time: 20 mins Yield: 4 Slimming world: 6 Syns per serving Ingredients: 2: Weight Watchers Wraps 1: egg, beaten 2 teaspoons: granulated sweetener 125 grams: quark 2 teaspoons: vanilla extract 11 grams: white chocolate Options, 1 sachet 100 grams: strawberries or other soft fruits Low-calorie cooking spray Instructions: Preheat your oven to 180°C. Spray the cream horn molds generously with low-calorie cooking spray to prevent sticking. Cut the Weight Watchers Wraps in half. Firmly wrap each half around a cream horn mold, ensuring the edges adhere tightly. Brush the wraps with the beaten egg, pressing firmly to strengthen the adhesion of the edges. Sprinkle granulated sweetener over the wrapped cones, such as Sukrin Gold. Arrange the coated cones on a baking tray. Place the baking tray in the preheated oven and bake for approximately 10 minutes or until the wraps turn golden brown and crisp. While the cones are baking, prepare the creamy filling. In a small bowl, whip the quark, vanilla extract, and white chocolate Options sachet until the mixture becomes light and fluffy. Cover the bowl with plastic wrap and refrigerate the creamy filling for at least 30 minutes to firm up. Once the wrap cones have cooled completely, carefully remove them from the cream horn molds. Place a couple of halved strawberries or other soft fruits into the bottom of each cone. Using a piping bag or a spoon, fill the cones with the chilled creamy filling. Garnish the cream-filled cones with additional strawberries or soft fruits to add a burst of freshness and color. Your Slimming World Cream Horns are now ready to be savored! Enjoy this indulgent yet guilt-free treat anytime you're craving a sweet indulgence. Tips: Use high-quality ingredients: The quality of your ingredients will greatly impact the taste and texture of your cream horns. Opt for fresh strawberries, creamy quark, and pure vanilla extract. Wrap the Weight Watchers Wraps tightly: Ensure the wraps are tightly wrapped around the cream horn molds to prevent them from falling apart during baking. Apply firm pressure and brush with beaten egg to reinforce the adhesion. Sprinkle the wraps generously with sweetener: The granulated sweetener, such as Sukrin Gold, will help the wraps caramelize and achieve a golden, crispy exterior. Fill the cones generously: Don't be shy when filling the cones with the creamy quark mixture. The more filling, the more delightful your cream horns will be. Garnish with a variety of fruits: Enhance the visual appeal and flavor of your cream horns by adorning them with a variety of fresh fruits, such as strawberries, blueberries, raspberries, or kiwi slices. Enjoy immediately: For the best taste and texture, savor your Slimming World Cream Horns right away. The crisp cones and creamy filling are meant to be enjoyed together. With these tips, you'll be well on your way to creating irresistible Slimming World Cream Horns that will satisfy your sweet tooth without derailing your weight loss journey.

Cream Horns Recipe

Slimming Cream Horns, a delightful treat that won’t derail your weight loss goals. These light and airy cones are crafted with fluffy quark, a creamy alternative to traditional pastry, and a touch of sweetness from white chocolate Options and granulated sweetener. Top with fresh strawberries or your favorite soft fruits for a burst of flavor .

About Time:

  • Prpe Time: 10 mins
  • Cook Time: 10 mins
  • Total Time: 20 mins
  • Yield: 4
  • Slimming : 6 per serving

Ingredients:

  • 2: Weight Watchers Wraps
  • 1: egg, beaten
  • 2 teaspoons: granulated sweetener
  • 125 grams: quark
  • 2 teaspoons: vanilla extract
  • 11 grams: white chocolate Options, 1 sachet
  • 100 grams: strawberries or other soft fruits
  • Low-calorie cooking spray

Instructions:

  1. Preheat your oven to 180°C.
  2. Spray the cream horn molds generously with low-calorie cooking spray to prevent sticking.
  3. Cut the Weight Watchers Wraps in half. Firmly wrap each half around a cream horn mold, ensuring the edges adhere tightly.
  4. Brush the wraps with the beaten egg, pressing firmly to strengthen the adhesion of the edges.
  5. Sprinkle granulated sweetener over the wrapped cones, such as Sukrin Gold.
  6. Arrange the coated cones on a baking tray.
  7. Place the baking tray in the preheated oven and bake for approximately 10 minutes or until the wraps turn golden brown and crisp.
  8. While the cones are baking, prepare the creamy filling. In a small bowl, whip the quark, vanilla extract, and white chocolate Options sachet until the mixture becomes light and fluffy.
  9. Cover the bowl with plastic wrap and refrigerate the creamy filling for at least 30 minutes to firm up.
  10. Once the wrap cones have cooled completely, carefully remove them from the cream horn molds.
  11. Place a couple of halved strawberries or other soft fruits into the bottom of each cone.
  12. Using a piping bag or a spoon, fill the cones with the chilled creamy filling.
  13. Garnish the cream-filled cones with additional strawberries or soft fruits to add a burst of freshness and color.
  14. Your Slimming Cream Horns are now ready to be savored! Enjoy this indulgent yet guilt-free treat anytime you’re craving a sweet indulgence.

Tips:

  1. Use high-quality ingredients: The quality of your ingredients will greatly impact the taste and texture of your cream horns. Opt for fresh strawberries, creamy quark, and pure vanilla extract.
  2. Wrap the Weight Watchers Wraps tightly: Ensure the wraps are tightly wrapped around the cream horn molds to prevent them from falling apart during baking. Apply firm pressure and brush with beaten egg to reinforce the adhesion.
  3. Sprinkle the wraps generously with sweetener: The granulated sweetener, such as Sukrin Gold, will help the wraps caramelize and achieve a golden, crispy exterior.
  4. Fill the cones generously: Don’t be shy when filling the cones with the creamy quark mixture. The more filling, the more delightful your cream horns will be.
  5. Garnish with a variety of fruits: Enhance the visual appeal and flavor of your cream horns by adorning them with a variety of fresh fruits, such as strawberries, blueberries, raspberries, or kiwi slices.
  6. Enjoy immediately: For the best taste and texture, savor your Slimming Cream Horns right away. The crisp cones and creamy filling are meant to be enjoyed together.
  7. With these tips, you’ll be well on your way to creating irresistible Slimming Cream Horns that will satisfy your sweet tooth without derailing your weight loss journey.

Curried Chicken Rice Bowl Recipe

Curried Chicken Rice Bowl Recipe Embrace a symphony of flavors with this delightful Low Syn Curried Chicken Rice Bowl, a culinary masterpiece crafted with wholesome ingredients and a touch of culinary artistry. About Time: Prep Time: 10 mins Total Time: 10 mins Yield:  Serves 4  Slimming World: 2 Syns Per Serving Ingredients: 2 cups (480ml) of cooked chicken 2 cups of cold cooked rice (infused with flavor by cooking in stock) ¼ cup of sweetcorn A generous handful of finely chopped cilantro ½ small red onion, finely chopped 1 red sweet apple, sliced into delectable segments 1 stick of celery, diced for added texture 20g of golden raisins (3 syns) for a touch of sweetness ¼ cup of fat-free yogurt for a creamy base The zesty juice of ½ lemon to awaken the senses 2 tablespoons of ½ Fat Mayonnaise (4 syns) for a delightful tang ½ tablespoon of sukrin: 1 or a sweetener of your choice to enhance the natural sweetness 1 teaspoon of curry powder to infuse the dish with its captivating aroma A generous dash of salt and black pepper to season to perfection Instructions: In a mixing bowl, whisk together the mayonnaise, yogurt, lemon juice, sukrin: 1, curry powder, and a pinch of salt and pepper until the dressing is smooth and creamy. Add the cooked chicken, cold rice, sweetcorn, cilantro, red onion, apple slices, celery, golden raisins, and the prepared dressing to a large bowl. Gently toss all the ingredients together until they are evenly coated with the flavorful dressing. Season the salad with additional salt and black pepper if desired. Serve the Low Syn Curried Chicken Rice Bowl garnished with a refreshing bed of crisp romaine or iceberg lettuce and a few zesty lemon slices. Enjoy this delightful Low Syn Curried Chicken Rice Bowl, a culinary creation that seamlessly blends wholesome ingredients with a symphony of flavors. Let your taste buds embark on a tantalizing journey as they savor the harmonious blend of textures and tastes. Tips: Use cooked chicken breast or thigh that has been cooked in a flavorful stock. This will add extra flavor to the rice bowl. To make the dressing even creamier, use Greek yogurt instead of fat-free yogurt. You can also add a tablespoon of mayonnaise for extra richness. If you don't have golden raisins, you can use dried cranberries or chopped apricots. For a spicier dish, add a pinch of cayenne pepper to the dressing. To make the salad even more filling, add a handful of chopped nuts or seeds. If you're looking for a lower-calorie option, you can skip the mayonnaise and use all yogurt. Here are some additional tips to make this recipe even more delicious: Garnish the rice bowl with a sprinkle of fresh cilantro and chopped scallions. Serve the rice bowl with a side of sliced avocado for extra healthy fats and fiber. For a fun twist, try adding some grilled shrimp or tofu to the rice bowl. If you're feeling adventurous, you can also add some chopped mango or pineapple to the rice bowl. No matter how you customize it, this Low Syn Curried Chicken Rice Bowl is sure to be a hit!

Curried Chicken Rice Bowl Recipe

Curried Chicken Rice Bowl Recipe. Embrace a symphony of flavors with this delightful Low Syn Curried Chicken Rice Bowl, a culinary masterpiece crafted with wholesome ingredients and a touch of culinary artistry.

About Time:

  • Prep Time: 10 mins
  • Total Time: 10 mins
  • Yield:  Serves 4
  • Slimming: 2 Per Serving

Ingredients:

  • 2 cups (480ml) of cooked chicken
  • 2 cups of cold cooked rice (infused with flavor by cooking in stock)
  • ¼ cup of sweetcorn
  • A generous handful of finely chopped cilantro
  • ½ small red onion, finely chopped
  • 1 red sweet apple, sliced into delectable segments
  • 1 stick of celery, diced for added texture
  • 1 Carrot cut into small pieces
  • ¼ cup of fat-free yogurt for a creamy base
  • The zesty juice of ½ lemon to awaken the senses
  • 2 tablespoons of ½ Fat Mayonnaise (4 syns) for a delightful tang
  • ½ tablespoon of sukrin: 1 or a sweetener of your choice to enhance the natural sweetness
  • 1 teaspoon of curry powder to infuse the dish with its captivating aroma
  • A generous dash of salt and black pepper to season to perfection
  • 200g fat-free natural fromage frais

Instructions:

  1. In a mixing bowl, whisk together the mayonnaise, yogurt, lemon juice, sukrin: 1, curry powder, and a pinch of salt and pepper until the dressing is smooth and creamy.
  2. Add the cooked chicken, cold rice, sweetcorn, cilantro, red onion, apple slices, celery, Carrot and the prepared dressing to a large bowl.
  3. Gently toss all the ingredients together until they are evenly coated with the flavorful dressing.
  4. Season the salad with additional salt and black pepper if desired.
  5. Serve the Low Syn Curried Chicken Rice Bowl garnished with a refreshing bed of crisp romaine or iceberg lettuce and a few zesty lemon slices.
  6. Enjoy this delightful Low Syn Curried Chicken Rice Bowl, a culinary creation that seamlessly blends wholesome ingredients with a symphony of flavors.
  7. Let your taste buds embark on a tantalizing journey as they savor the harmonious blend of textures and tastes.

Tips:

  1. Use cooked chicken breast or thigh that has been cooked in a flavorful stock. This will add extra flavor to the rice bowl.
  2. To make the dressing even creamier, use Greek yogurt instead of fat-free yogurt. You can also add a tablespoon of mayonnaise for extra richness.
  3. If you don’t have golden raisins, you can use dried cranberries or chopped apricots.
  4. For a spicier dish, add a pinch of cayenne pepper to the dressing.
  5. To make the salad even more filling, add a handful of chopped nuts or seeds.
  6. If you’re looking for a lower-calorie option, you can skip the mayonnaise and use all yogurt.

Here are some additional tips to make this recipe even more delicious:

  1. Garnish the rice bowl with a sprinkle of fresh cilantro and chopped scallions.
  2. Serve the rice bowl with a side of sliced avocado for extra healthy fats and fiber.
  3. For a fun twist, try adding some grilled shrimp or tofu to the rice bowl.
  4. If you’re feeling adventurous, you can also add some chopped mango or pineapple to the rice bowl.
  5. No matter how you customize it, this Low Syn Curried Chicken Rice Bowl is sure to be a hit!

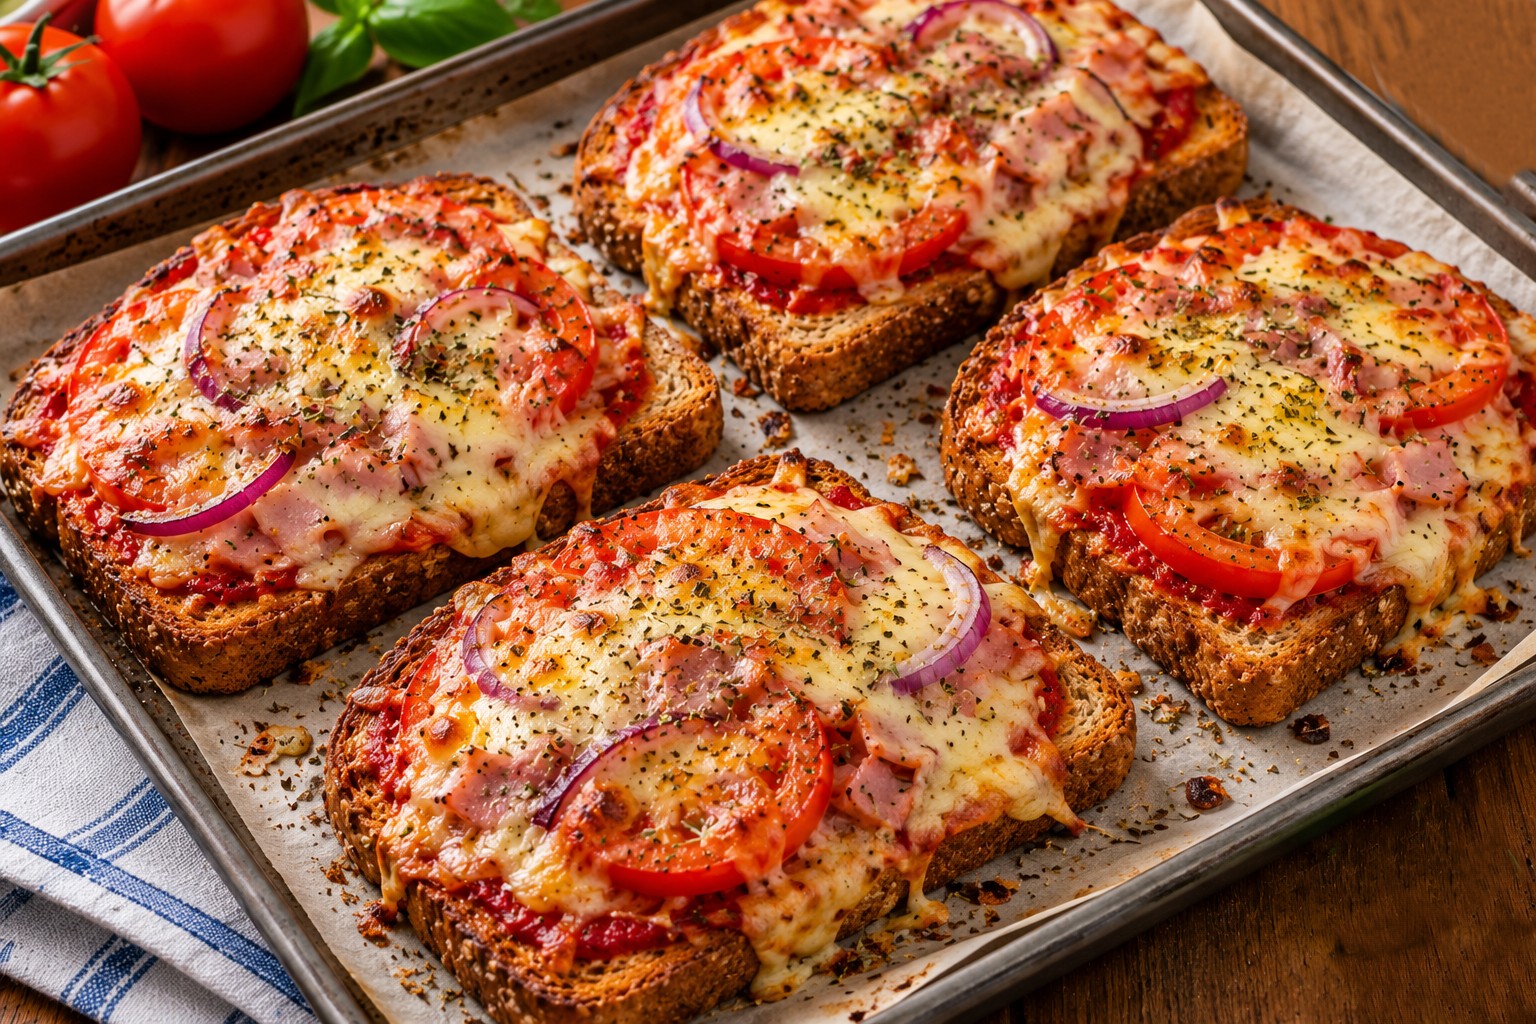
Easy Pizza Toasts Recipe – Quick and Budget-Friendly Family Lunch

Four homemade pizza toasts topped with melted mozzarella, tomato, red onion and herbs on wholemeal bread.

Craving pizza but don’t have time to prepare dough? These easy pizza toasts turn everyday slices of bread into a delicious, cheesy lunch or light family dinner in around 20 minutes.

Made with wholemeal bread, tomato passata, mozzarella and simple toppings, they’re a practical way to use ingredients already in your fridge. Toasting the bread before adding the toppings helps keep the edges crisp while the cheese melts beautifully in the oven.

Whether you’re preparing an after-school snack, a weekend lunch or a quick midweek tea, this homemade pizza toast recipe is easy to adapt to everyone’s favourite flavours.

Why You’ll Love These Pizza Toasts

  • Ready in approximately 20 minutes.
  • No pizza dough or specialist equipment needed.
  • Uses affordable ingredients from UK supermarkets.
  • Easy to customise with leftover cooked vegetables.
  • A convenient recipe for smaller households or individual portions.

Recipe at a Glance

Details Information
Servings 4 pizza toasts
Preparation time 10 minutes
Cooking time 8–12 minutes
Total time Approximately 20–22 minutes
Cooking method Oven
Course Lunch or light dinner

Ingredients

  • 4 slices wholemeal bread
  • 4 tbsp tomato passata
  • 80g grated mozzarella
  • 1 medium tomato, thinly sliced
  • ½ small red onion, finely sliced
  • 2 slices cooked ham, chopped (optional)
  • ½ tsp dried Italian herbs
  • Freshly ground black pepper

Ingredient Notes

Bread: Wholemeal bread provides a sturdy base, but white bread, seeded bread or thick slices from a loaf also work.

Passata: Use plain tomato passata rather than a watery tomato sauce. A tablespoon per slice is usually enough.

Mozzarella: Grated mozzarella melts evenly and creates a familiar pizza-style topping. You can use a small amount of grated Cheddar if that’s what you already have.

Tomato: Slice thinly and pat dry with kitchen paper to remove excess moisture.

Ham: Optional. Use ready-cooked ham only, or leave it out for a meat-free version.

How to Make Pizza Toasts

Step 1: Preheat the Oven

Heat your oven to 200°C (180°C fan).

Line a baking tray with baking parchment if desired.

Step 2: Lightly Toast the Bread

Toast the bread until it feels slightly firm but hasn’t become deeply browned.

Arrange the slices in a single layer on the baking tray.

This quick step helps stop the tomato sauce from soaking into the bread.

Step 3: Add the Tomato Base

Spread approximately one tablespoon of passata over each slice, leaving a narrow border around the edges.

Sprinkle with dried Italian herbs and a little black pepper.

Step 4: Add Your Toppings

Divide the sliced red onion, tomato and optional chopped ham between the four slices.

Scatter the grated mozzarella evenly over the top.

Avoid piling on too many toppings, as this can make the bread difficult to crisp.

Step 5: Bake Until the Cheese Melts

Bake for 8–12 minutes, until the mozzarella is melted and the edges of the bread are crisp.

Check towards the end of cooking, as thinner slices may brown more quickly.

Serve immediately while the cheese is warm.

How to Stop Pizza Toast from Going Soggy

The secret to good pizza toast is controlling moisture.

Lightly toast the bread before assembling, use a thin layer of passata and pat the tomato slices dry.

If you’re adding mushrooms or other vegetables that release water, cook them first and drain away excess liquid.

Arrange the finished toasts in a single layer rather than stacking them, which traps steam underneath.

Budget-Friendly Pizza Toast Topping Ideas

One of the best things about homemade pizza toasts is that you don’t need to buy a completely new set of ingredients.

Try these combinations:

  • Vegetable pizza toast: Sweetcorn, finely chopped peppers and mozzarella.
  • Mushroom pizza toast: A few cooked mushrooms with herbs and cheese.
  • Ham and tomato: Chopped cooked ham, thin tomato slices and mozzarella.
  • Leftover vegetable toast: Small amounts of cooked peppers, onions or other suitable vegetables from yesterday’s dinner.

Use ingredients you already have and avoid adding so many toppings that the bread becomes overloaded.

What to Serve with Pizza Toasts

For a light lunch, serve one pizza toast with cucumber sticks, carrot sticks or a simple salad.

To turn the recipe into a more substantial family meal, pair it with homemade tomato soup or steamed vegetables.

Our Simple Tomato and Basil Soup makes a particularly convenient accompaniment.

Can You Prepare Pizza Toasts Ahead?

You can slice the vegetables, grate the cheese and prepare the toppings in advance. Store perishable ingredients appropriately in the fridge.

For the best texture, assemble the pizza toasts immediately before baking.

Leftovers should be cooled promptly, refrigerated and eaten within 48 hours. Reheat until thoroughly hot, preferably in the oven to help restore some crispness.

Frequently Asked Questions

Can I make pizza toast without an oven?

Yes. A suitable air fryer can work well. Follow your appliance’s instructions and check frequently, as the bread may cook faster than in a conventional oven.

Can I use pitta bread instead?

Absolutely. Pitta bread, sliced rolls or other sturdy bread bases can be used. Adjust the cooking time according to their thickness.

Can I make vegetarian pizza toasts?

Yes. Leave out the ham and use vegetable toppings. Check that your cheese is suitable for vegetarians if needed.

What cheese works best for pizza toast?

Mozzarella is a good choice because it melts smoothly. A little Cheddar can add extra flavour, but it isn’t essential.

Can I use tomato purée instead of passata?

Yes, but tomato purée is more concentrated. Dilute a small amount with water and season to taste before spreading it over the bread.

More Easy Budget Family Meals

Small, adaptable recipes like these pizza toasts can make weekly meal planning easier, especially when you want to use ingredients before they go to waste.

Explore our Budget Family Meals UK guide for more affordable dinner inspiration, or organise your weekly menu with our Free UK Family Meal Planner.
Hot and sour chicken pho recipe

Hot and Sour Chicken Pho recipe

Hot and Sour Chicken Pho recipe. This flavorful and authentic pho is perfect for a satisfying and slimming meal. It’s made with a tangy soy and ginger sauce, tender chicken, crisp vegetables, and a hint of spice. The rice noodles are cooked to perfection in the flavorful broth, and the whole dish is topped with fresh coriander for a refreshing garnish.

About Time:

  • Prep Time: 10 mins
  • Cook Time: 30 mins
  • Total Time: 40 mins
  • Yield: 4 Serves
  • Slimming: Free

ngredients:

  • 350g pot Soy & Ginger Sauce
  • 600ml hot chicken stock
  • 2 dried rice noodle nests (we used the wide kind)
  • 1 red chilli, deseeded and thinly sliced (don’t deseed the chilli if you prefer a hotter pho), plus extra to serve
  • 1 lime, rind peeled into thick slivers
  • 2 cooked skinless and boneless chicken breasts, torn into small pieces
  • 5 spring onions, shredded
  • 1 large pak choi, cut into 2cm-thick slices
  • 80g mushrooms, very thinly sliced
  • Small pack fresh coriander, reserving a few leaves or sprigs to serve

Instructions:

  1. Cook the sauce according to the pack instructions.
  2. Pour the sauce into a large non-stick saucepan. Add the stock and noodles and bring to the
    boil.
  3. Reduce the heat to low, cover, and simmer for 5 minutes, or until the noodles are cooked.
  4. Add the chilli, lime rind, chicken, spring onions, pak choi, mushrooms, and coriander. Cook for 5
    minutes, or until piping hot.
  5. Discard the lime rind.
  6. Ladle the pho into deep bowls.
  7. Garnish with the reserved coriander sprigs and extra chilli, to taste.

Serving suggestions:

  1. Serve with a side of fresh rice noodles or rice.
  2. Enjoy with a squeeze of lime juice.
  3. Top with chopped peanuts or sesame seeds for extra crunch and flavor.

Additional tips:

  • For a spicier pho, add more deseeded chilli slices.
  • If you don’t have rice noodles, you can use vermicelli noodles instead.
  • This pho can be made ahead of time and reheated in the microwave.
  • I hope you enjoy this flavorful and slimming hot and sour chicken pho!

Bakewell trifles recipe

Bakewell trifles recipe These light and flavorful trifles are crafted with carefully chosen ingredients to create a satisfying, yet health-conscious, culinary experience. From the airy almond-infused sponge to the luscious layers of sugar-free jelly, quark-infused custard, and fat-free, no-added sugar cherry yogurt, Follow our simple steps to create this culinary masterpiece, and savor the guilt-free pleasure of a Bakewell trifle reimagined for a healthier lifestyle. About Time: Prep Time: 15 mins Cook Time: 35 mins plus 1 hour cooling and chilling Total Time: 50 mins plus 1 hour cooling and chilling Yield: Serves 4 Slimming World: 5½ Syns per serving Ingredients: 2: medium eggs 1 level tsp: sweetener granules 2 level tbsp: self-raising flour 1 tsp: almond extract 1 level tbsp: raspberry jam 10: fresh cherries, halved and pitted (or raspberries can be used as an alternative) 11.5g: sachet sugar-free raspberry jelly crystals 4 tbsp: plain quark 250g: low-fat custard 160g: pot fat-free, no-added sugar cherry yogurt 10g: flaked almonds, toasted, for decoration Instructions: Preheat your oven to 180°C/fan 160°C/gas 4. In a bowl placed over a pan of boiling water, whisk together the eggs and sweetener using an electric hand whisk for approximately 5 minutes, or until the eggs have tripled in volume. Remove the bowl from the heat and sift the flour over the mixture. Gently fold the flour and almond extract into the mixture using a metal spoon and a figure-of-eight motion. Spoon the batter into a small non-stick loaf tin and bake for 10-12 minutes or until golden. Allow it to cool in the tin. Cut the sponge lengthwise, spread it with raspberry jam, and then cut it into small cubes. Arrange the cubes in four tall glasses and distribute the halved cherries among them. Prepare the jelly by dissolving the sugar-free raspberry jelly crystals in 300ml boiling water. Set it aside to cool to room temperature without allowing it to set. Pour the cooled jelly into the glasses and chill for 1 hour or until fully set. Once the jelly has set, mix the quark into the custard and spoon the custard over the jelly. Top with the cherry yogurt and garnish with cherries. Sprinkle toasted flaked almonds evenly over the trifles before serving. Tips: Achieve the desired light and fluffy texture for the sponge by whisking the eggs and sweetener over a pan of boiling water until they triple in volume. This step is crucial for the overall success of the trifle. When incorporating the flour and almond extract into the egg mixture, use a metal spoon and a figure-of-eight motion to fold gently. This ensures that the air created during whisking is retained, resulting in a soft and airy sponge. When spreading the raspberry jam on the sponge and arranging the cubes in glasses, ensure an even distribution of flavors by spreading the jam uniformly and placing cherries (or raspberries) evenly throughout the layers. Allow the dissolved sugar-free raspberry jelly to cool to room temperature before pouring it over the sponge cubes. This prevents premature setting and ensures a smooth and well-incorporated layer. Patience is key during the chilling phase. Let the trifles set in the refrigerator for at least 1 hour after assembling to allow the layers to firm up and the flavors to meld for a cohesive and delightful result. Toast the flaked almonds just before serving to maintain their crunchiness. Sprinkle them evenly over the trifles for a final touch that adds both visual appeal and a delightful nutty flavor. Feel free to personalize the recipe by experimenting with different fruits or adjusting the sweetness level to suit your taste preferences. The versatility of this recipe allows for creative adaptations while maintaining its slimming qualities.

Bakewell trifles recipe These light and flavorful trifles are crafted with carefully chosen ingredients to create a satisfying, yet health-conscious, culinary experience. From the airy almond-infused sponge to the luscious layers of sugar-free jelly, quark-infused custard, and fat-free, no-added sugar cherry yogurt, Follow our simple steps to create this culinary masterpiece, and savor the guilt-free … Read more

Clementine Orange Aero trifles Recipe

Clementine Orange Aero trifles Recipe Tangy Citrus Bliss Trifles with a Sweet Surprise. Perfect for any occasion bringing together the zesty essence of clementines, the creaminess of banana custard yoghurt, Follow our easy steps and tips to create a dessert that is as pleasing to the eyes as it is to the palate. Get ready to savor the perfect balance of sweet and tangy in every delightful bite! Nutritional Information: Prep Time: 20 mins plus cooling and chilling yield: Makes 4 Total Syns: 12 Syns per Serving: 3 Ingredients: 8 ripe clementines (swiftly peeled) 2 containers of Aldi Banana Custard yoghurts (1 syn each) Aldi fat-free Greek Yoghurt (syn-free) 11g pouch of White Chocolate Options (2 syns) Hartleys sugar-free orange jelly crystals (1.5 syns) 25g Grated Aldi orange bubbly chocolate (7 syns) Instructions: Prepare a fruit-infused jelly base. Layer the banana Custard yoghurt on top. Whisk the Greek Yoghurt with the contents of the white chocolate pouch. Grate the indulgent orange bubbly chocolate. Tips: Opt for fresh and juicy clementines to maximize the citrus flavor. Choose ones that are easy to peel for a quicker preparation process.  For a refreshing experience, chill the yoghurts and fruits before assembling the trifles. The cool temperature adds a delightful touch to each spoonful. Add a crunch element by incorporating a layer of crushed biscuits or granola between the fruity jelly and creamy yoghurt layers. This introduces a pleasant textural contrast.  Tailor the recipe to meet your dietary preferences by adjusting the syn values. You can explore alternative sweeteners or reduce the quantity of higher syn items to create a lighter version without compromising on taste.

Clementine Orange Aero trifles Recipe Clementine Orange Aero trifles Recipe. Tangy Citrus Bliss Trifles with a Sweet Surprise. Perfect for any occasion bringing together the zesty essence of clementines, the creaminess of banana custard yoghurt, Follow our easy steps and tips to create a dessert that is as pleasing to the eyes as it is … Read more

Last-Minute Christmas Cake Recipe

Last-Minute Christmas Cake Recipe by Slimming World If you think making a Christmas cake is difficult, then think again. This one-pot wonder is a breeze to make and can be made in advance or last minute. Either way it never disappoints. About Time: Prep Time: 15 mins Cook Time: 1hour 30 mins Total Time: 1 hour 45 mins Yield: Serves 20 Slimming World:  5½ Syns per serving Ingredients: 500g assortment of dried fruits 250ml freshly brewed hot black tea 3 tablespoons sweetener granules 2 teaspoons mixed spice 250g prepared pumpkin or butternut squash chunks 2 large eggs 1 tablespoon Sarson’s Browning 1 teaspoon bicarbonate of soda 100g plain wholemeal flour 100g plain flour Instructions: In a non-stick pan over medium heat, combine dried fruit, hot black tea, sweetener, and mixed spice. Slowly bring the mixture to a boil, stirring continuously. Simmer uncovered for 3 minutes. Remove from heat, cover, and let it plump up overnight. The next day, preheat the oven to 160°C/fan 140°C/gas 3. Line the base and sides of a deep 20cm x 20cm cake tin with non-stick baking paper. Boil the pumpkin or squash chunks in a pan of water over high heat for 15 minutes. Drain well, transfer to a food processor, and blend into a smooth purée. Add the puréed pumpkin or squash, eggs, Sarson’s Browning, and bicarbonate of soda to the fruit mixture. Sift in both flours and gently mix. Spoon the mixture into the prepared tin, leveling the surface lightly. Bake the cake for 1 hour or until a skewer inserted into the center comes out clean. Let the cake cool in the tin. Once cooled and ready to serve, remove the cake from the tin and cut it into 20 slices. Wrap the cake in greaseproof paper and foil, then store in an airtight container for up to 1 week. Tips: Choose a variety of high-quality dried fruits for a rich and diverse flavor profile. Consider using a mix that includes raisins, currants, sultanas, and chopped dried apricots. Experiment with different types of black tea to add nuanced flavors to the cake. . Adjust the sweetener to your taste preferences. . If you don't have pumpkin or butternut squash, consider using sweet potato puree as a substitute. Ensure thorough lining of the cake tin with non-stick baking paper to prevent sticking and ease in removing the cake later. Perform the skewer test in a few different spots to guarantee that the cake is thoroughly cooked. If the skewer comes out clean, it's ready. Consider serving the cake with a dollop of Greek yogurt or a light dusting of powdered sugar for an extra touch of elegance. To truly save time, you can pre-mix the dry ingredients and store them in an airtight container. This way, when you're ready to bake, you only need to combine them with the wet ingredients. Adjust the size of the cake slices based on your preference and the number of guests. You can opt for smaller, bite-sized portions for a party or larger slices for a family gathering.

Last-Minute Christmas Cake Recipe  Last-Minute Christmas Cake Recipe . If you think making a Christmas cake is difficult, then think again. This one-pot wonder is a breeze to make and can be made in advance or last minute. Either way it never disappoints. About Time: Prep Time: 15 mins Cook Time: 1hour 30 mins Total … Read more

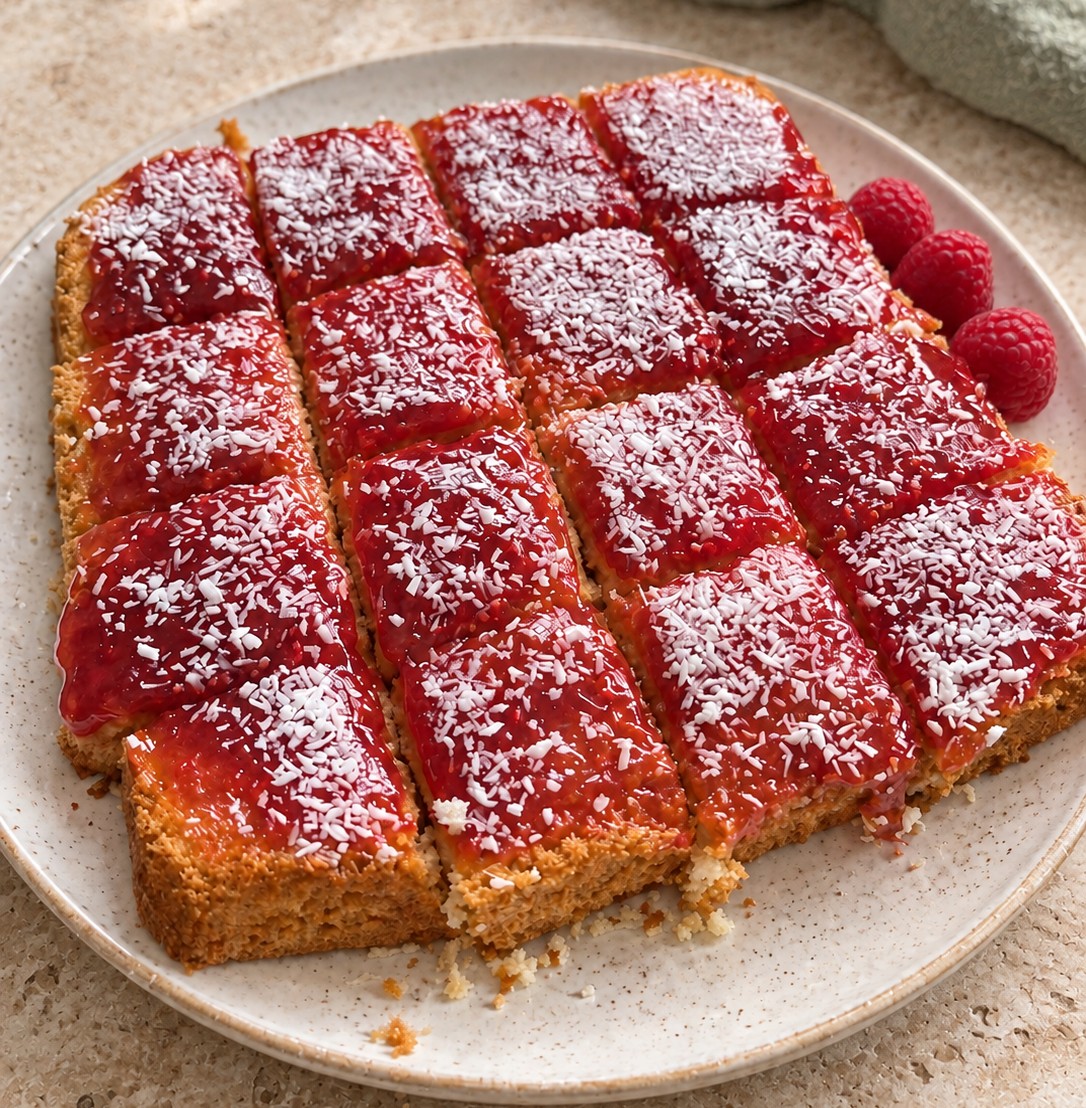
Raspberry and Coconut Sponge Recipe

Raspberry and Coconut Sponge Recipe

These light and fluffy raspberry and coconut sponge squares combine soft vanilla cake, fruity raspberry jam, and a delicate coconut topping. Ready in around 30 minutes, this easy vegetarian bake is perfect for afternoon tea, parties, lunchboxes, or a simple homemade dessert. Recipe Details Prep time: 10 minutes Baking time: 10–15 minutes Cooling time: At … Read more